How to Remove and Prevent Water Stains on Leather Shoes
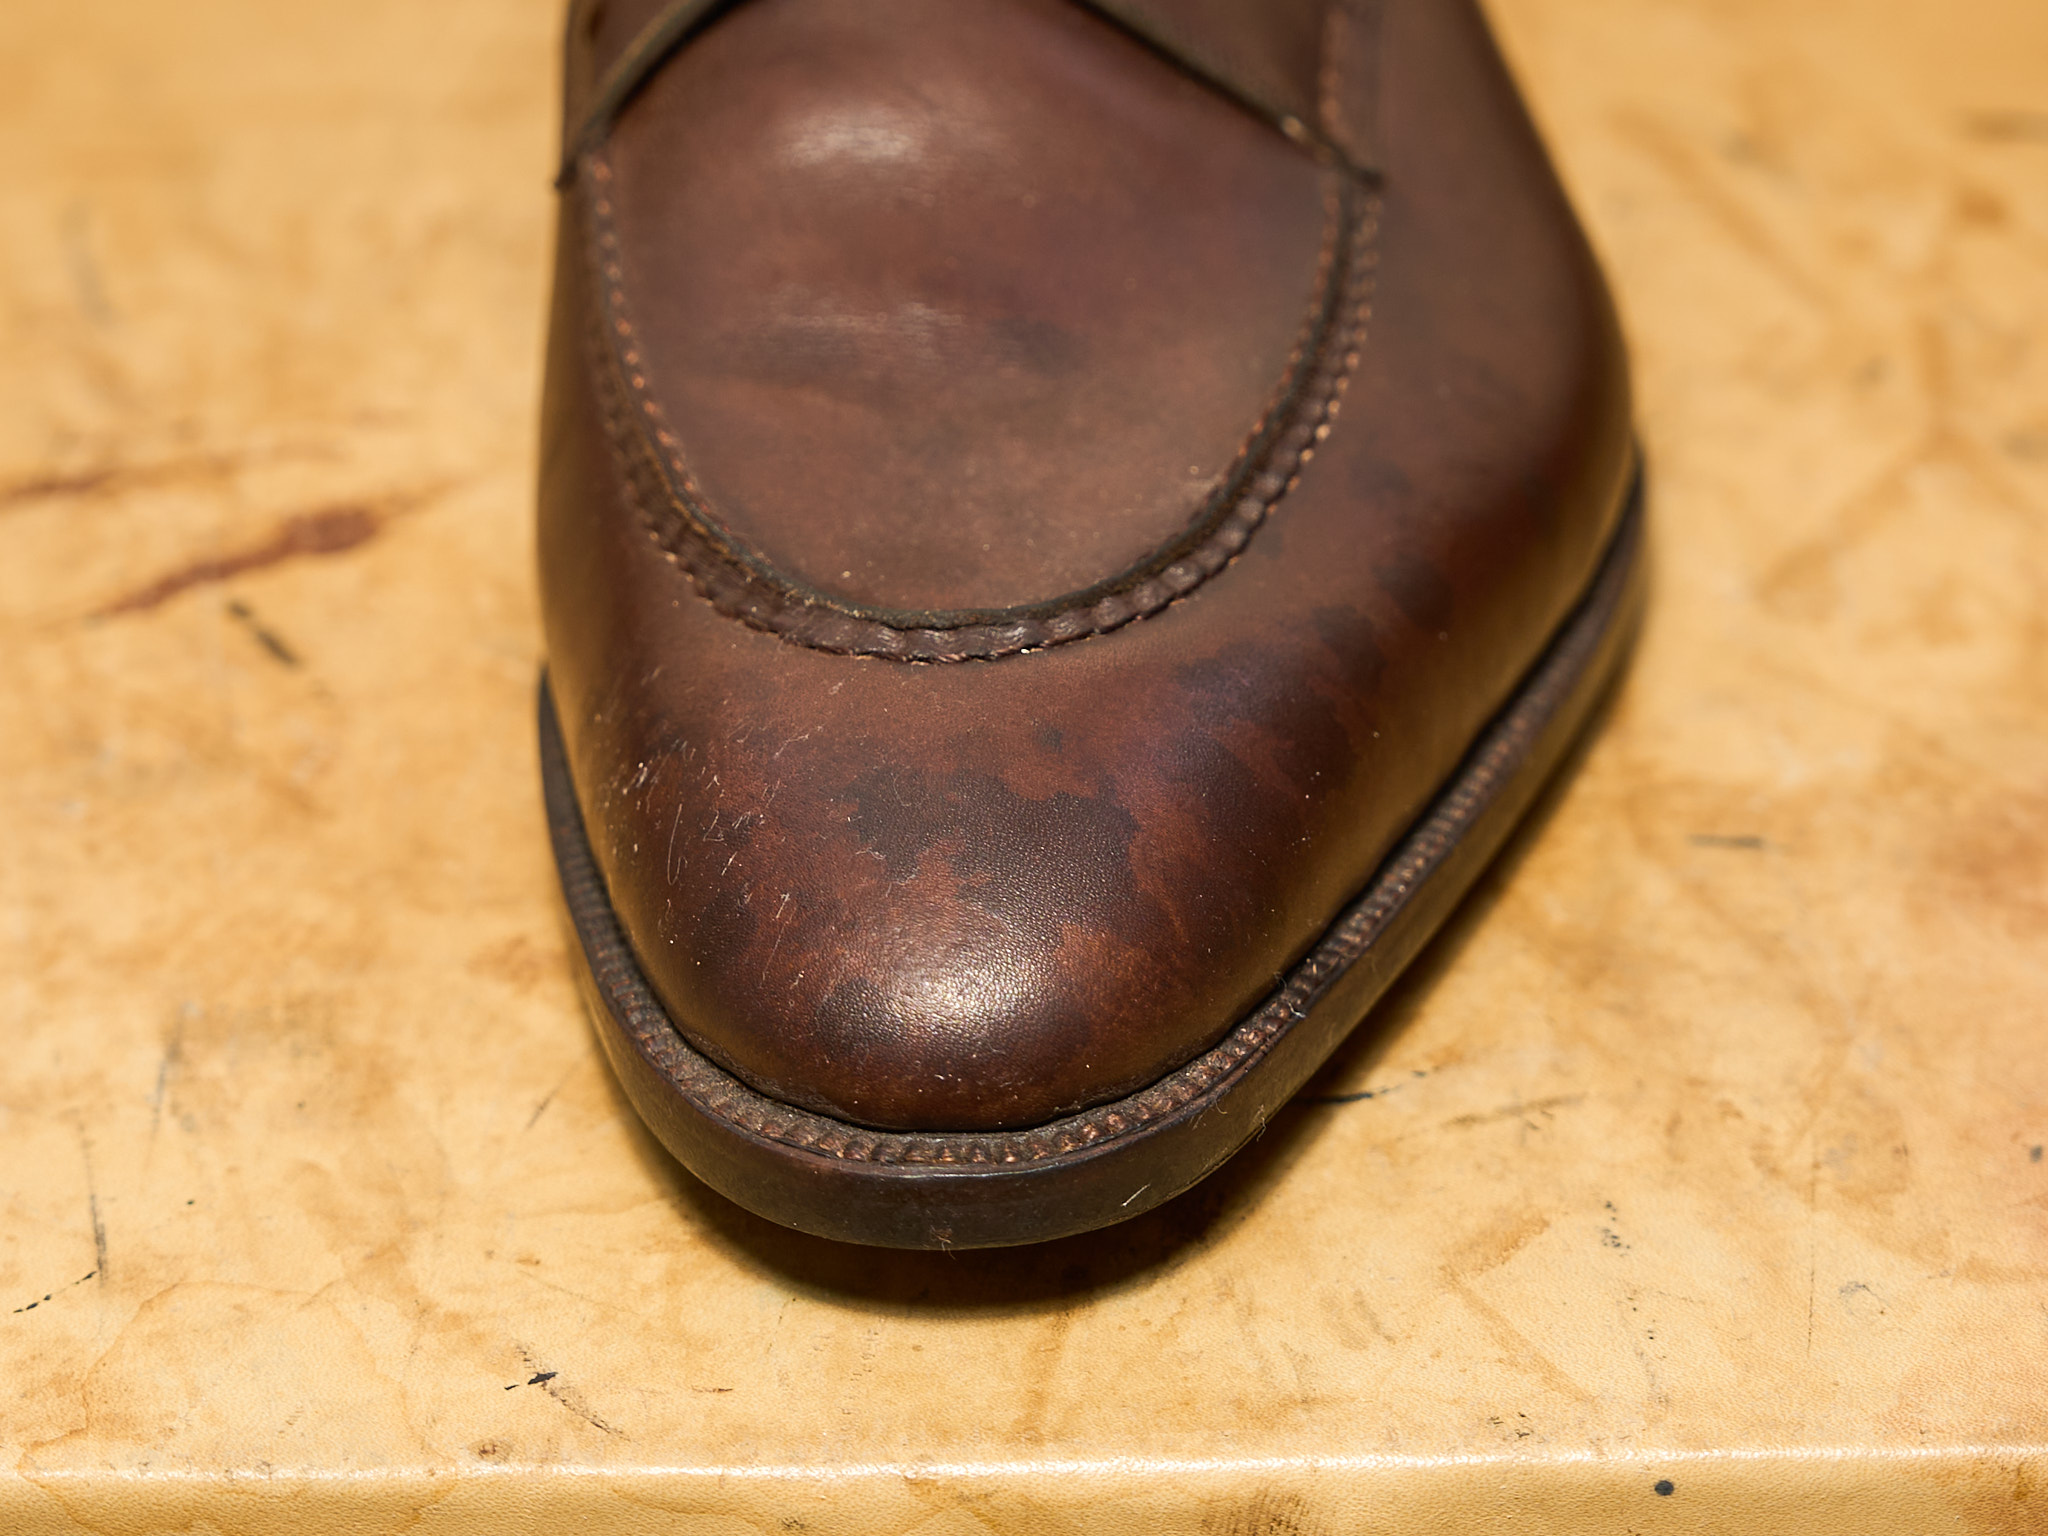
After a day in the rain, you may notice water stains and uneven patches on your shoes.
Many people see the stain and think the leather is ruined.
However, it is not. With the right steps, water stains can be removed.
In this article, I will share a method we use in our workshop to remove water stains from shoes.
What Causes Water Stains—and Why a Full Wash Is the Best Solution
Why does plain water leave such unsightly marks on leather?
Leather contains various components—tanning agents, oils, and dyes.
When rainwater is absorbed into a certain area of the shoe, the moisture spreads toward drier areas, carrying the inner leather components along with it.
After the moisture evaporates, those redistributed components remain where they settled. That is what a water stain really is.
When oils and dyes concentrate in one spot, they can cause dark stains to form. When salts and minerals from rain or sweat concentrate in an area, you see white water spots.
In either case, the stain is not due to dirt from outdoors. It is caused by the leather's internal imbalance—a redistribution of the leather's own components.
To restore the balance, you need to evenly wet the entire shoe and reset the imbalance. This is what a full wash does.
An imbalance created by water is best resolved with water.
How to Remove Water Stains: The Full Wash Process
The idea of washing leather shoes with water may make you feel anxious.
And rightly so. When wet leather dries, essential oils escape with the moisture. Washing with plain water or household soap will damage the leather.
However, by using saddle soap—a soap formulated with conditioning agents for leather—and following the proper process of washing, drying, and replenishing oils, you can avoid this risk.
In fact, a full wash can remove old cream buildup and sweat residue from leather, leaving it in a better condition than before.
Below, I will walk you through the tools and each step.
Tools You Will Need
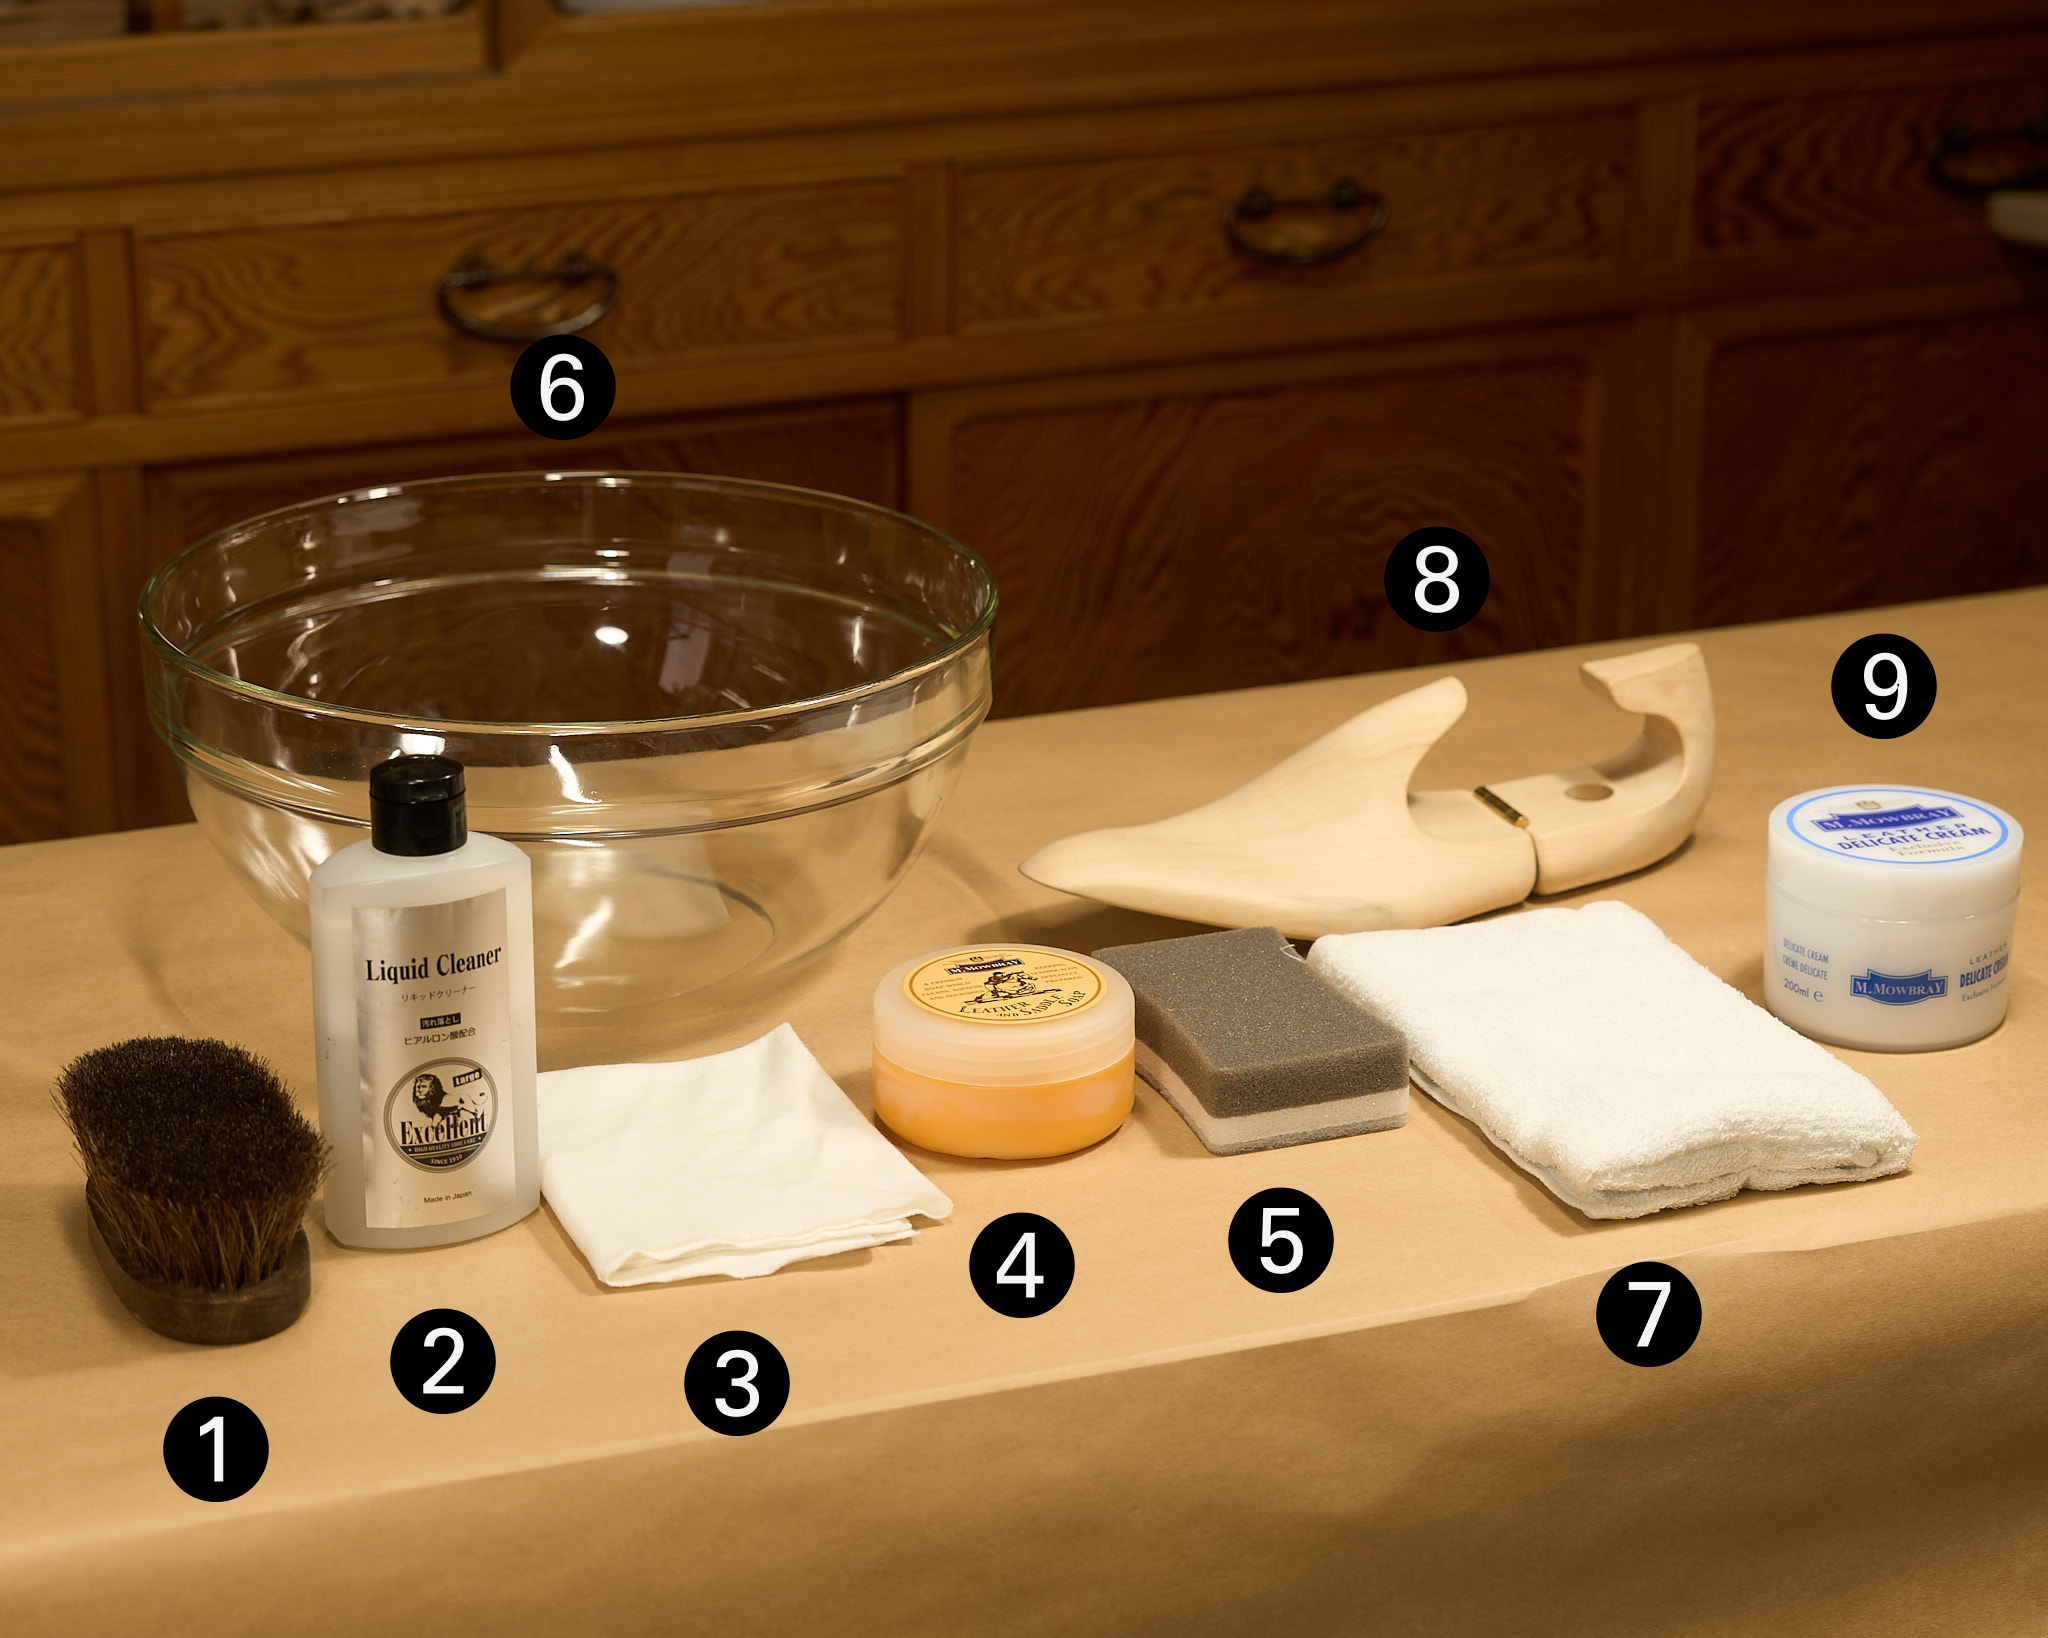
1. Horsehair brush — For removing dust before washing. Horsehair is soft and dense, making it ideal for cleaning fine particles from stitching and grain.
2. Leather cleaner — For removing old cream and wax from the leather surface.
3. Cloth — For applying the cleaner, use an old cotton T-shirt. Choose a soft, 100% cotton fabric.
4. Saddle soap — A soap made specifically for leather. As the name suggests, it was originally developed for cleaning leather saddles and tack. It cleans while simultaneously nourishing the leather with essential oils.
5. Sponge — For lathering the saddle soap and gently washing the leather. Choose one with a fine, soft texture to avoid scratching the grain surface.
6. Bowl — For holding water and lathering the saddle soap. You will not be submerging the shoes into the bowl, so it does not need to be large.
7. Towel — For wiping off moisture after washing. Choose one with high absorbency. Also, use a towel that you don't mind getting dirty.
8. Shoe trees — For keeping the shoes in shape while drying. Wooden ones are the best—cedar is ideal for its moisture-absorbing properties.
9. Conditioning cream — For replenishing moisture and oils after the shoes have dried. Unlike regular shoe cream, this type has a higher water content and absorbs more deeply into the leather.
Now, let me walk you through each step.
Step 1: Brush Off Dust with a Horsehair Brush
Start by brushing off any dust and debris from the surface, then stitch with a horsehair brush.
If the shoes have laces, remove them first.
Since you will be washing the shoes next, a thorough brushing is not necessary. The goal is to remove loose dust before it turns to mud when wet. A quick brushing is enough.
Step 2: Pre-Clean with Leather Cleaner
Wrap a cloth around your finger, apply a small amount of cleaner, and gently wipe away old cream and surface grime.
Removing this layer beforehand allows the saddle soap to penetrate deeper into the leather.
Use just enough cleaner to dampen the cloth.
Do not scrub. Wipe gently, as if stroking the surface, to avoid scratching.
Do not pre-clean the entire shoe all at once. Work one shoe at a time, using a clean section of the cloth and reapplying cleaner every 3–4 times until the whole surface is clean.
Step 3: Wash the Entire Shoe with Saddle Soap
This is where we will use water.
Fill a bowl with water and work the saddle soap into a lather with your sponge.
Scoop the soap with the sponge and squeeze, and repeat until a fine, even lather forms.
Then, using the lathered sponge, gently wash the entire shoe in smooth, even strokes.
Avoid applying pressure when cleaning. Think of it as spreading the lather into the pores of the leather, not scrubbing it.
Give extra attention to stained areas, but still without applying pressure—use gentle, circular motions, as if massaging the leather.
The key here is not to remove the stain. It is to wet the entire shoe evenly.
When the leather is evenly moisturized, watermarks and stains caused by concentrated salts and oils fade. You are not technically "washing" with the lather, but you are "delivering moisture."
Always use the soft side of the sponge. Wet leather is vulnerable—a rough surface can scratch or damage the grain.
If water reaches the inside of the shoe—especially the insole—it may warp or crack as it dries.
Insole damage directly affects the shoe's fit, and once it occurs, it cannot be reversed.
Step 4: Wipe Off the Lather with a Towel
Dampen a towel, wring it out firmly, and lightly wipe the lather from the surface.
You do not need to remove every trace of foam. It is enough to clear the visible lather from the surface.
With most soaps, you would rinse everything away. Saddle soap is different.
Beyond its cleaning agents, saddle soap contains fats and waxes that protect and condition the leather.
For this reason, the proper method is to wipe—not rinse—leaving those conditioning agents in the leather.
Step 5: Insert Shoe Trees and Dry
Insert shoe trees and let the shoes dry.
Place them in a well-ventilated area, away from direct sunlight, and allow 24–48 hours for them to air-dry completely.
Never use direct sunlight or a heater. Rapid drying causes the leather fibers to shrink, leading to cracks and severe deformation.
If the soles got wet during the wash, position the shoes so the soles are elevated and exposed to air.
This improves airflow to the bottom and reduces the risk of mold.
Step 6: Replenish Oils with Conditioning Cream
Saddle soap contains conditioning agents, but even so, the leather will lack moisture and oils after drying.
Touch the surface. It will feel slightly dry and rough.
Apply conditioning cream while the leather is still slightly damp, or immediately after it has fully dried.
You can use a cloth or apply it directly with your fingers.
Apply generously. You can remove the excess conditioning cream in the next step.
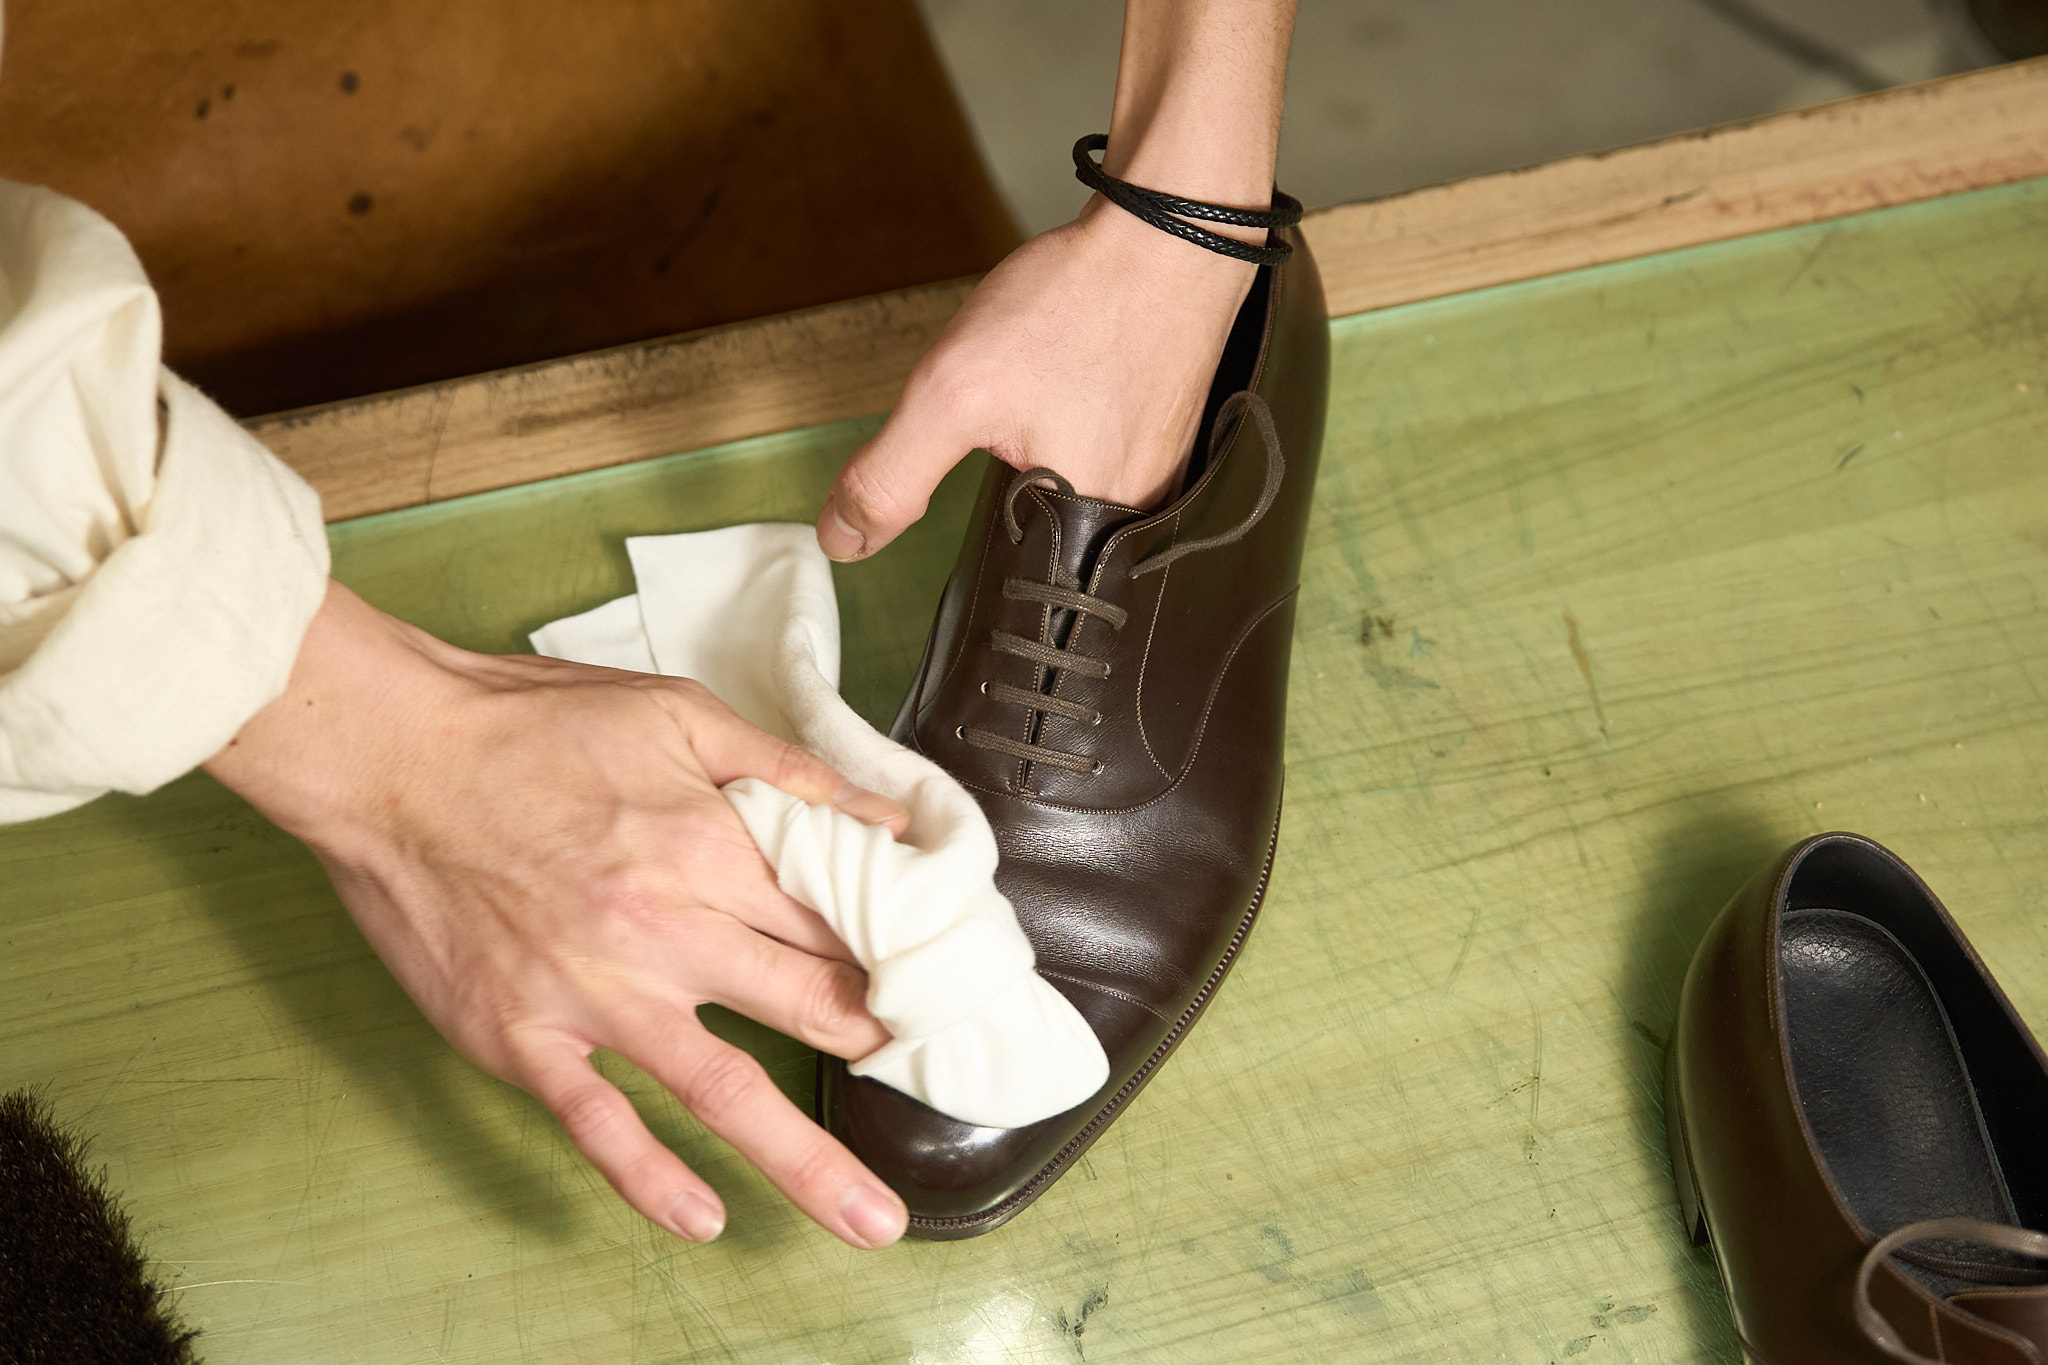
Step 7: Wipe Off Excess Conditioning Cream
Finally, wipe off the excess conditioning cream with a clean cloth.
Work quickly and gently, leaving behind an even thin layer on the surface.
Done: Check the Result
The full wash is complete.
Hold the shoe under a light and inspect the area where the water stains were. If the marks have disappeared and the leather has returned to a uniform texture, you have succeeded.
It takes time and effort, but your shoes are now clean and ready to wear again.
If the stains persist after multiple attempts, the leather may be deeply damaged. In that case, do not make further attempts—consult a professional repair shop.
Before You Start: Notes by Color, Material, and Condition
The approach varies depending on the shoe's color, material, and stain condition. Some materials should not be fully washed, and some situations call for professional help. Review the notes below before proceeding.
Light Brown and Tan Shoes: Wash Evenly to Avoid New Stain Lines
Light brown and tan shoes show water spots far more visibly than black ones.
When washing these shoes, especially focus on evenly wetting the entire surface.
If you only wet part of the shoe, the boundary between the wet and dry areas will create new watermarks. Do not hesitate. Wet the entire shoe evenly.
Black Shoes: Stains May Be Hidden, but the Leather Still Hardens
For black shoes, water stains are less visible, so they are often ignored.
But beneath the surface, oils have still migrated. Left untreated, those areas harden over time.
"The stain does not look bad" is not the same as "it is fine." The best practice is to do a full wash to remove the stains, then follow the prevention steps described later in this article.
Old, Dried Stains: Soften from the Inside to Release Them
Water stains left untreated for months can harden, and a single full wash may not be enough to remove them.
In that case, apply a saddle soap lather to the stained area and let it sit for a few minutes to soften the leather. Then use the back of a spoon or your finger to massage the area inside the shoe, pressing outward.
Apply slowly with steady pressure, as if loosening stiff fibers.
Suede and Nubuck: Do Not Use This Method
The method described in this article is for smooth leather only.
Applying it to napped leathers like suede or nubuck can flatten the nap and ruin the texture.
Napped leathers require a dedicated shampoo and a brass brush—a completely different process. Do not apply the method described here.
Vegetable-Tanned Leather: Consult a Professional if Possible
Chrome-tanned leather, used in most dress shoes, handles water well. Vegetable-tanned leather does not.
Vegetable-tanned leather is highly absorbent. When wet, its internal components shift easily, leaving deep brown stains that tend to set permanently.
If your shoes are vegetable-tanned, I recommend consulting a specialist rather than attempting this at home.
(If you are unsure whether your shoes are vegetable-tanned, feel free to leave a comment with a photo, and I will help you identify them.)
Common Remedies Found Online—and Why They Can Be Risky
If you search for how to remove water stains from leather shoes, you will find plenty of DIY solutions using common household items.
As someone who works with leather every day, many of these methods are risky.
Vinegar: Risk of Discoloration and Damage
Vinegar is often recommended for water stains and salt residue. Acidity does help dissolve mineral deposits, such as calcium.
However, chrome-tanned leather has a mildly acidic pH of 4–5, while household vinegar is much stronger at pH 2–3.
When a strongly acidic liquid soaks into leather, it can react with the dyes, causing discoloration, or strip too much oil, leaving the leather rough and damaged.
Dish Soap: Risk of Cracking and Color Loss
Dish soap is formulated to cut through grease.
When dish soap is used on leather, it strips it of its natural oils. Without these oils, the leather dries out and becomes prone to cracking.
There is also a high risk of the dye being stripped, leading to color fading.
Hair Dryers and Heaters: Irreversible Heat Damage
Blowing hot air onto wet leather causes the leather's proteins to denature. The leather shrinks and hardens.
Once heat damage occurs, it cannot be undone.
When drying wet shoes, resist the urge to use a hair dryer or heater. Always air-dry.
After the Wash: How to Prevent Water Stains
A full wash requires many tools and a good deal of time and effort. Regular care can help prevent water stains and water spots from forming in the first place.
Waterproof Spray: Your First Line of Defense
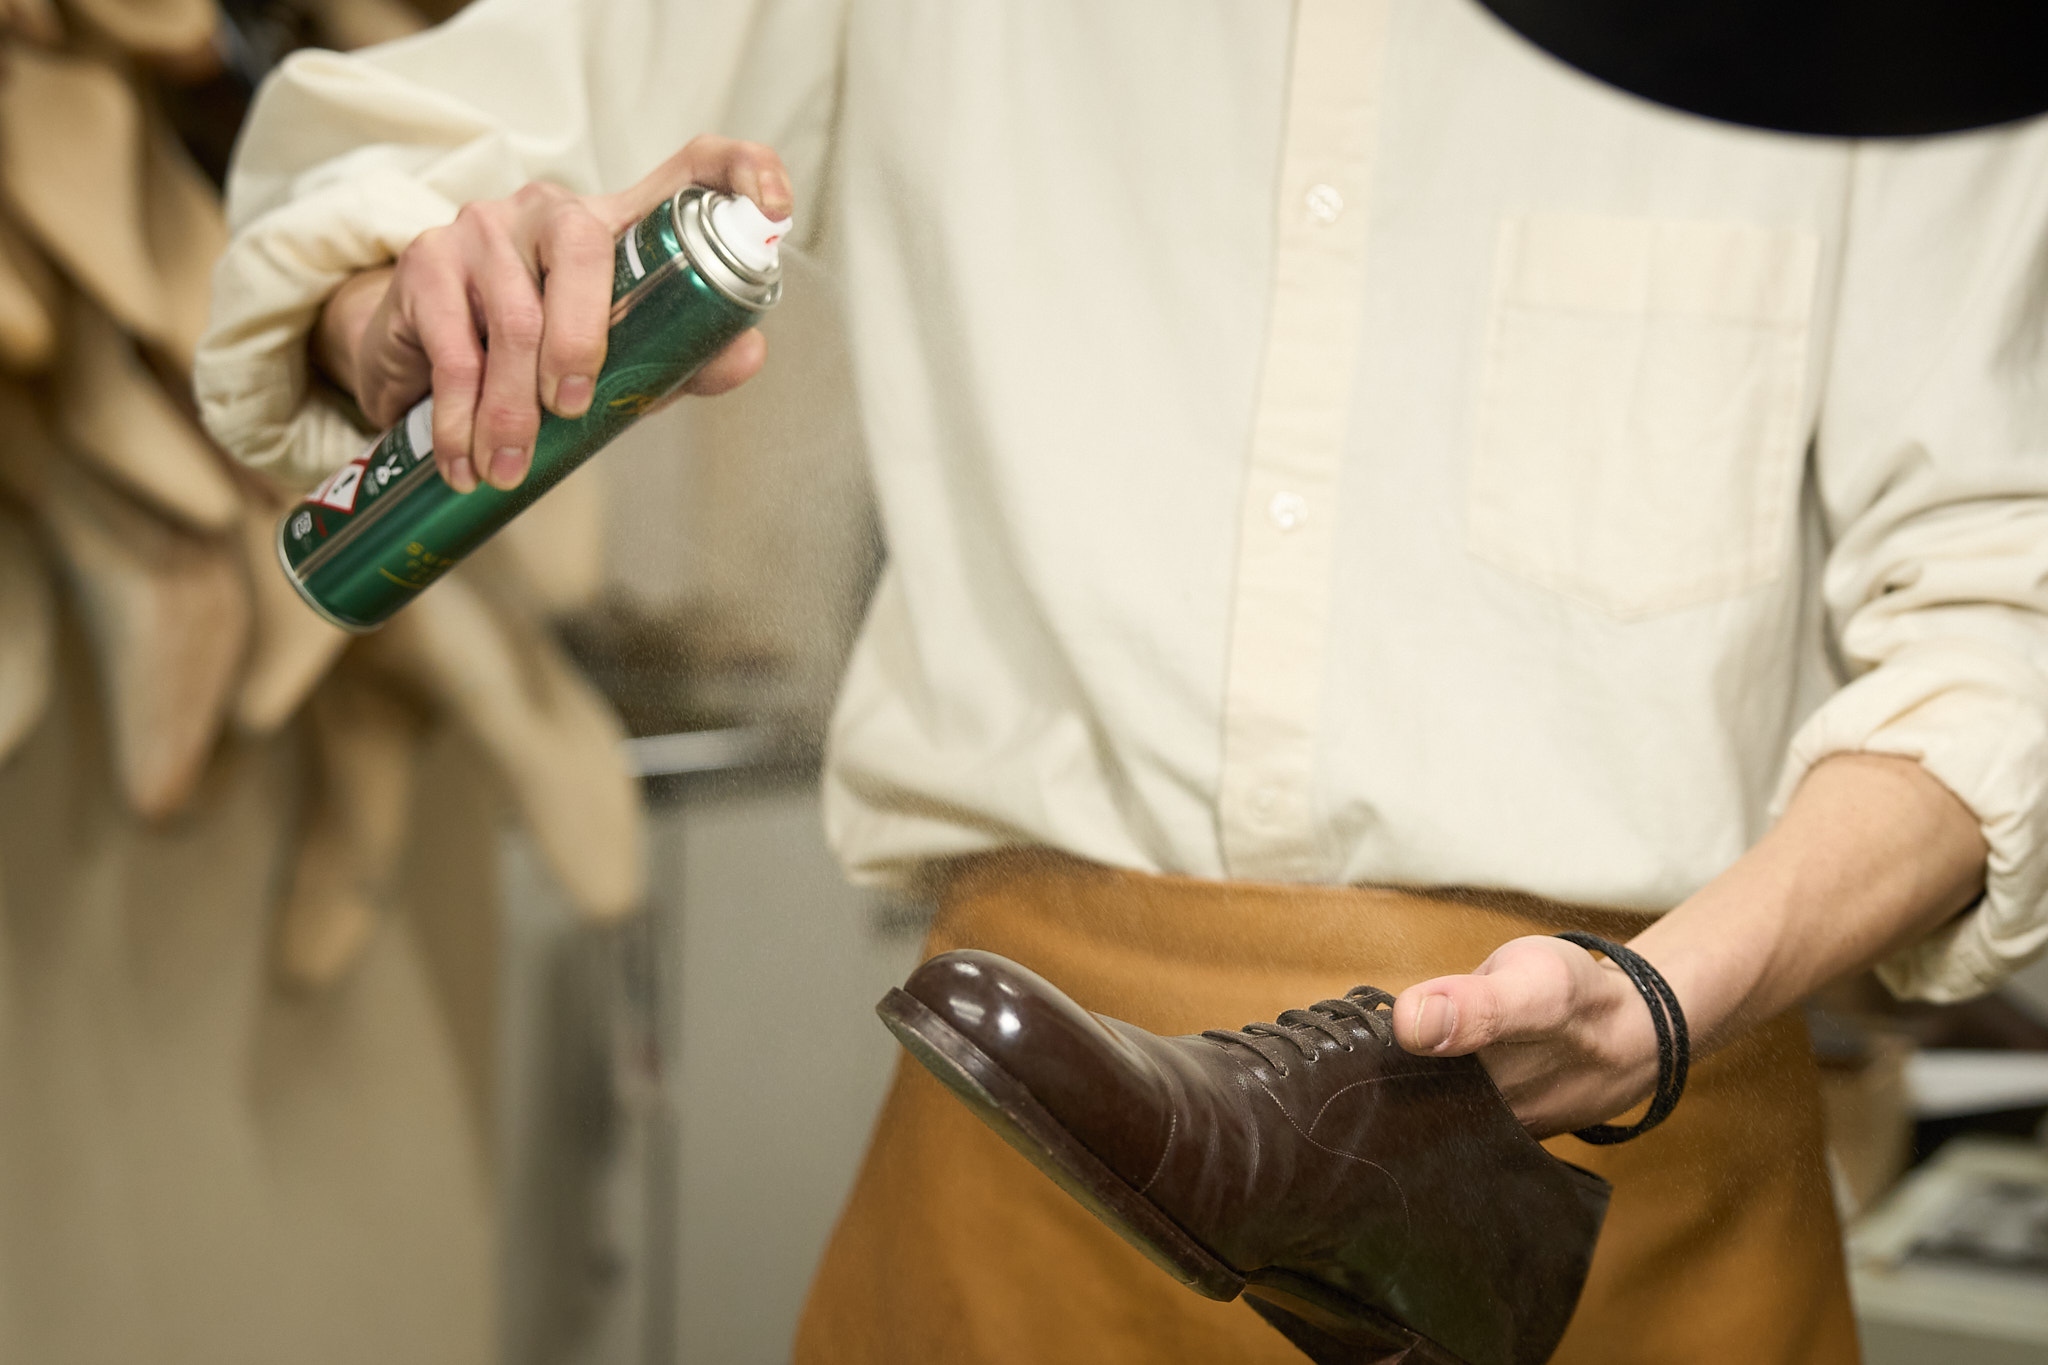
A waterproof spray protects your shoes from rain. For shoes you wear often, reapply every two weeks.
Do not apply right before wearing. The best time is the night before, or at least 30 minutes before you wear it.
Hold the can about 30 cm away and apply a light and even mist over the entire shoe. Rather than one heavy coat, apply thin layers—spray, let it dry, and spray again.
After Getting Caught in the Rain
If your shoes get wet, take care of them as soon as you get home. Wipe the surface dry with a towel and brush off any mud.
Then insert shoe trees to hold the shape and let the shoes dry in a well-ventilated spot.
Keeping the leather nourished as part of your routine with conditioning cream will also help protect against water stains.
Frequently Asked Questions
Q. Will the water stains disappear completely, or fade?
With the right treatment at the right time, water stains can be removed completely—to a point where they are invisible to the naked eye. However, if the stains are left for a long time and the leather has deteriorated—hardened, or cracked—the stain may be gone, but texture irregularities or marks may remain.
Early treatment is key.
Q. When should I take my shoes to a professional?
If you feel uncertain or have tried washing once and the stains show no sign of improvement, take them to a professional without hesitation. They have access to stronger yet more precise solutions and a keen eye for assessing the leather's condition.
Q. I used waterproof spray, but my shoes still got stained. Why?
Waterproof spray is not an impenetrable seal. Its effectiveness fades over time. In heavy rain—or if the shoes are soaked, such as stepping into a puddle—water can still get through the barrier.
Even with waterproof spray applied, never skip the after-rain care routine.
Water stains are an inevitable part of owning leather shoes. But once you know how to handle them, there is no need to worry.
Your first full wash may feel daunting. After doing it once, you will find it easy.
I hope this guide helps you keep your shoes in good shape for years to come.