How to Fix Scuffed Leather Shoes: A Shoemaker’s Guide by Damage Depth
When your leather shoes pick up a scuff mark, it's not always clear what to do.
A "scratch" is not just damage. The tools and the steps vary completely, depending on how deep the damage goes into the leather.
If you misidentify the type of damage, you won't be able to repair it properly. In the worst case, you can make the damage worse than before.
In this article, I'll show you how to tell the damages apart and how to fix each one.
The Three Types of Damage: Scuff, Scratch, and Deep Scratch
There are three types of damage to leather shoes, depending on how deeply the scratch penetrates the leather.
Before you decide how to repair, look at your shoes and figure out which type of damage you're dealing with.
1. Scuff
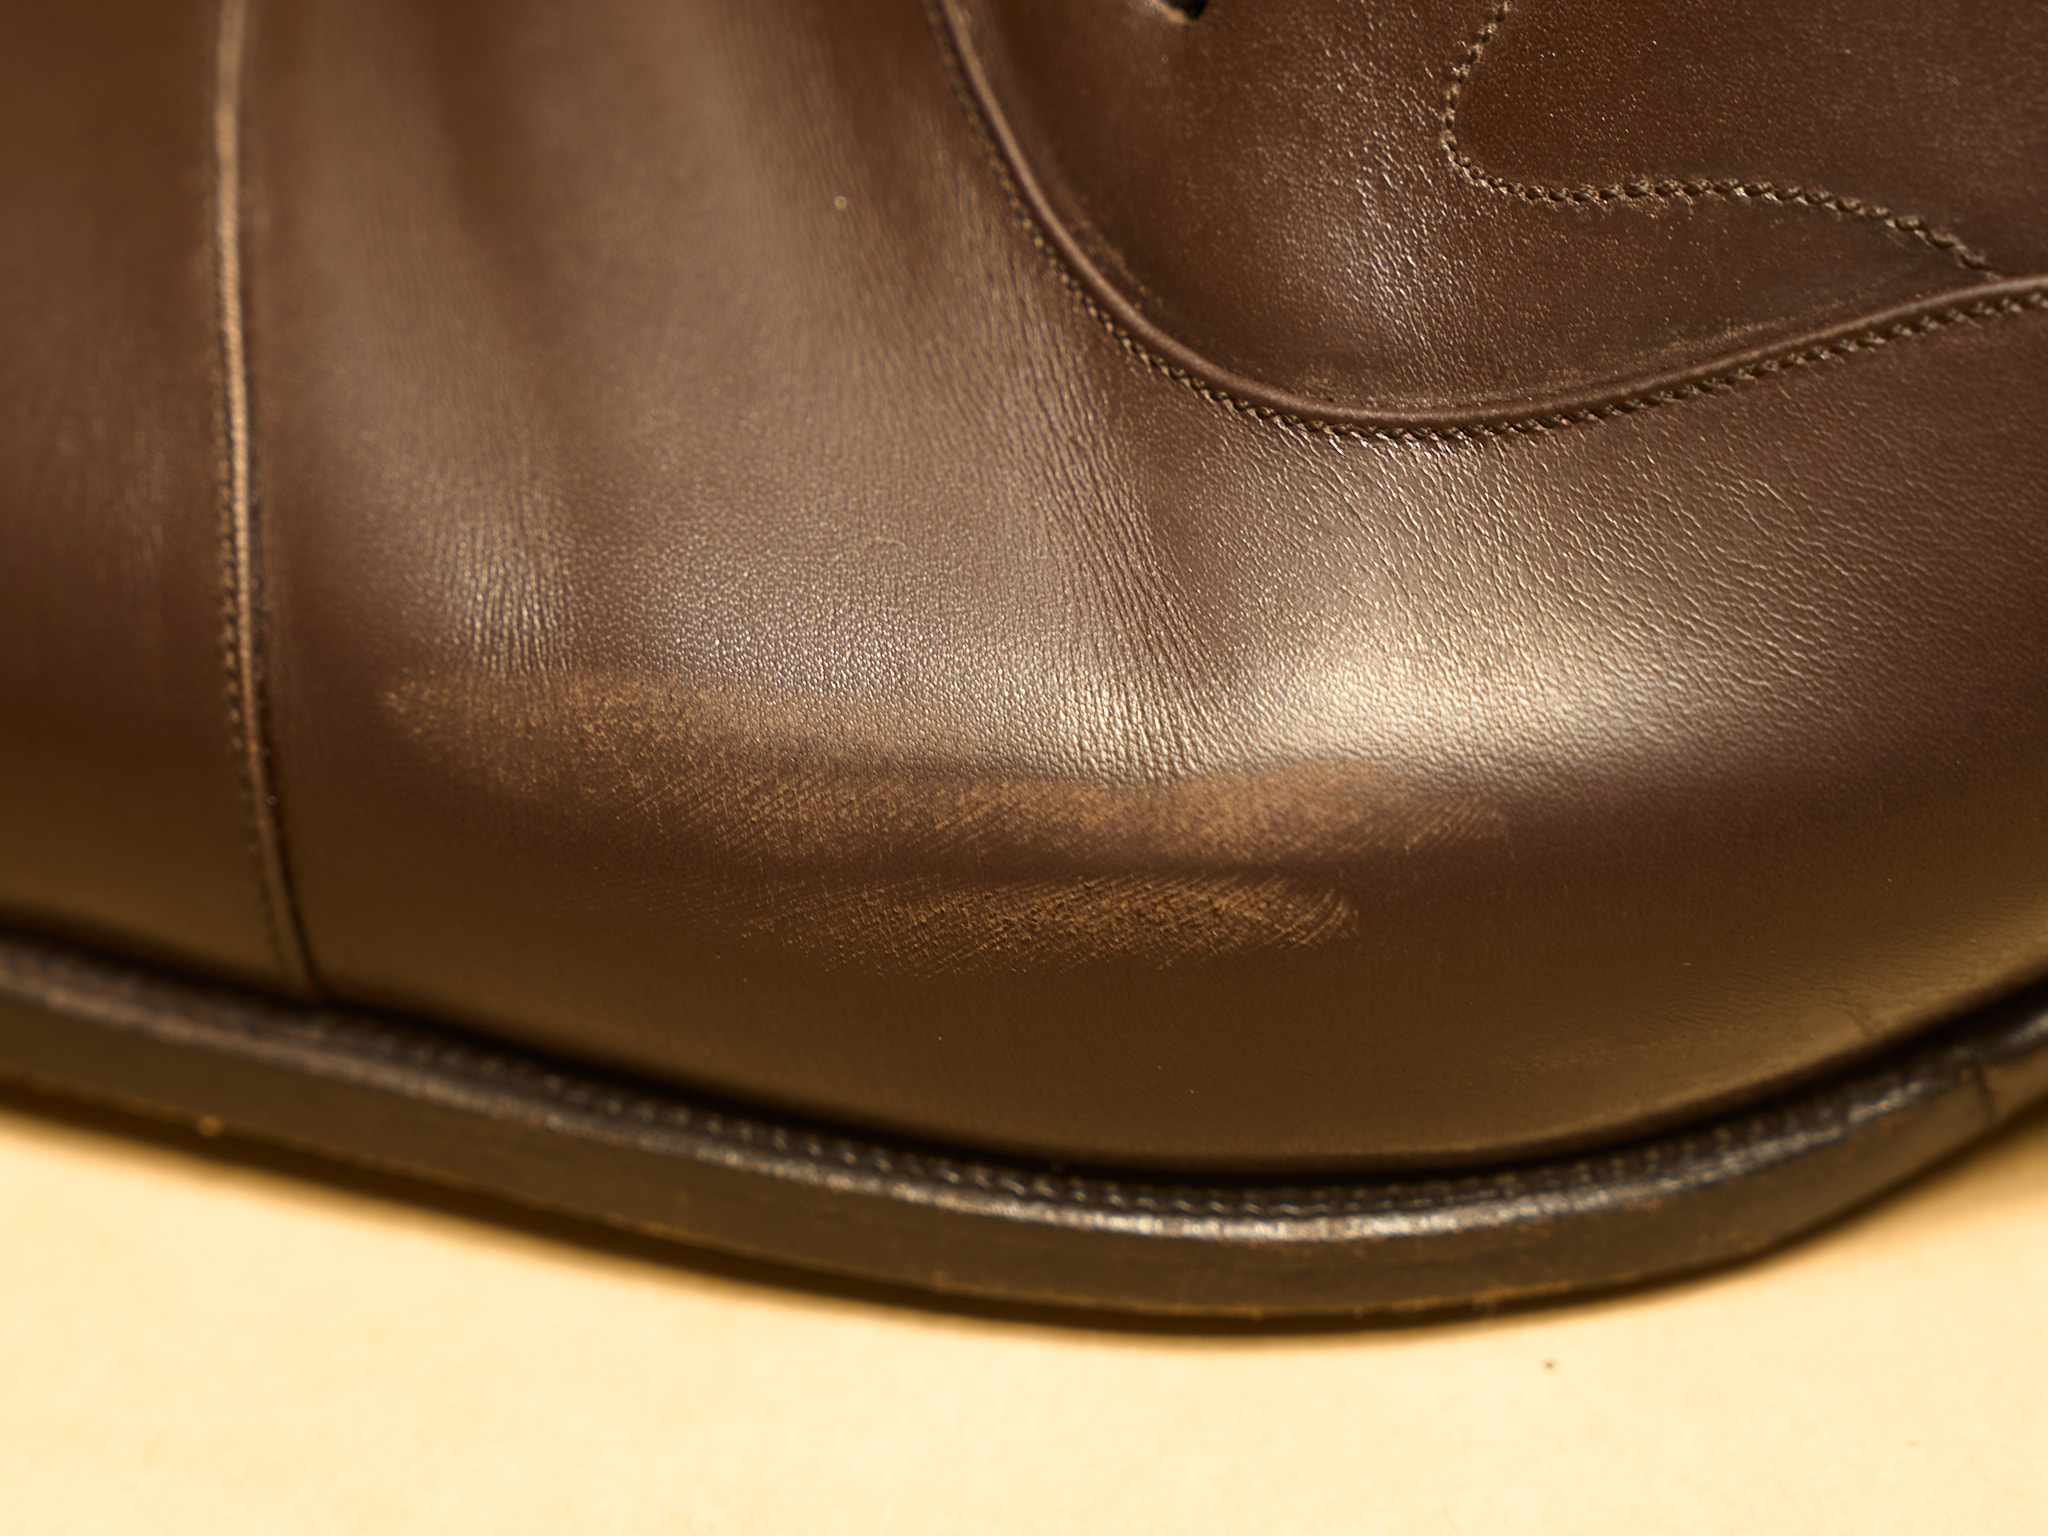
A "scuff" is the lightest form of damage. The grain layer on the surface — the dense fiber layer of the leather — has rubbed against something, causing the color and shine to fade in the scuff.
If the surface hasn't changed and the area looks faded or cloudy white, treat it as a scuff.
You can fix it by simply smoothing the rubbed surface.
2. Scratch
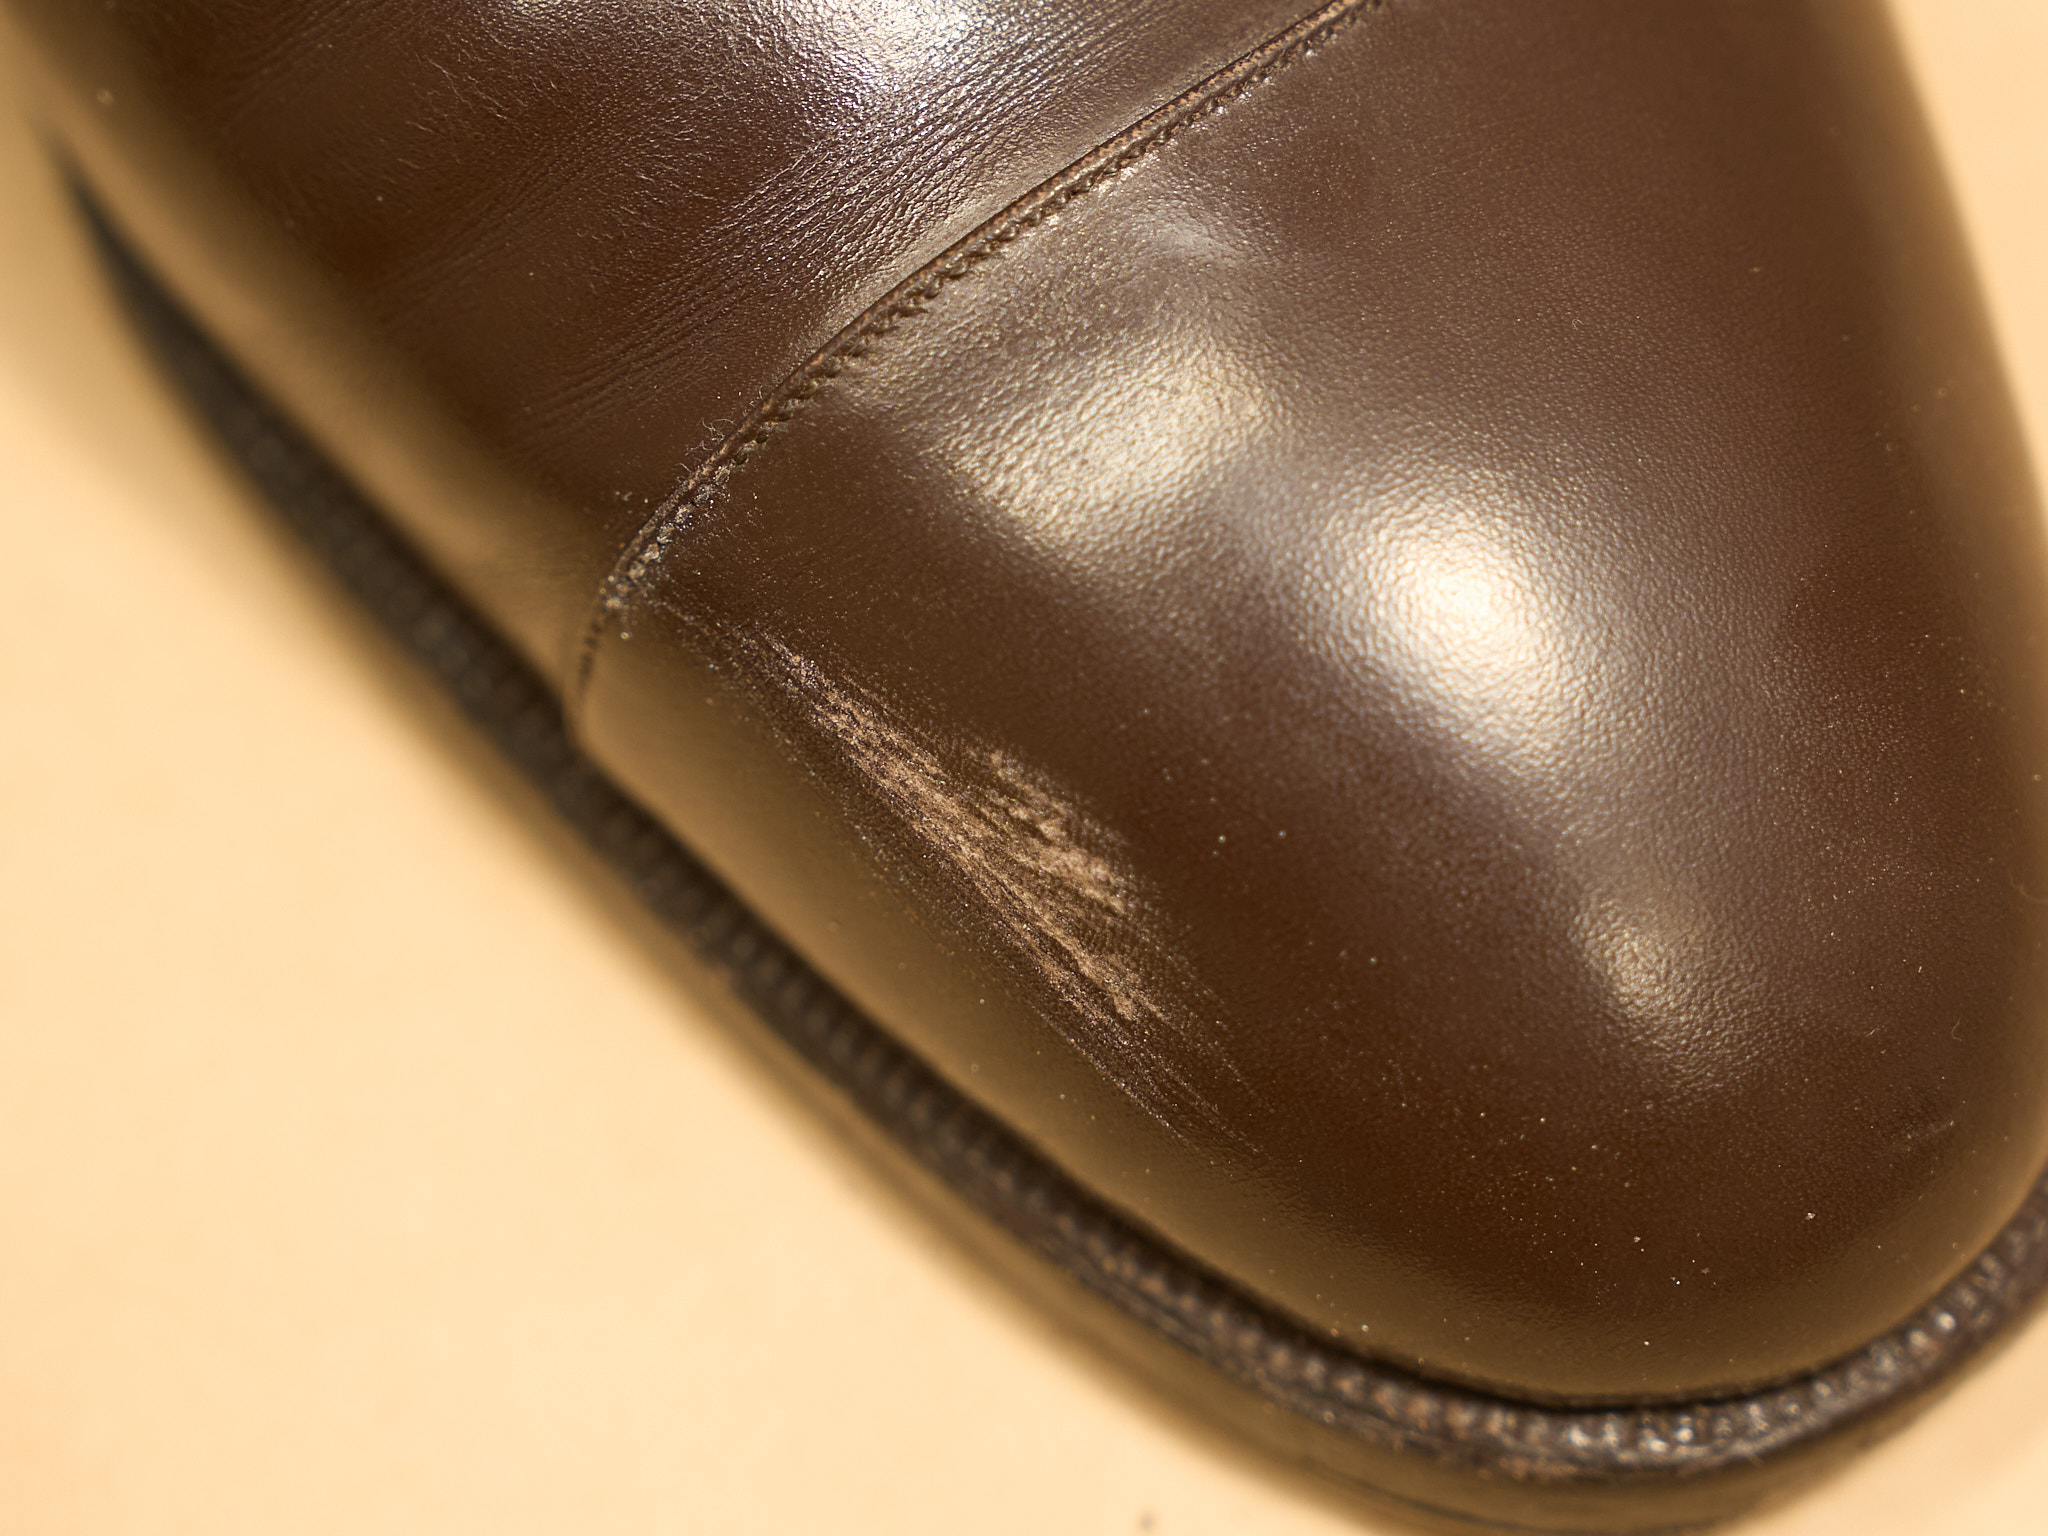
A "scratch" passes through the finish layer and reaches the grain layer, leaving the leather's surface rough.
The surface wear may be slight. But if you can see the bare color of the fibers in the scraped area, treat it as a scratch.
This can also be repaired at home with only a few tools.
3. Deep Scratch
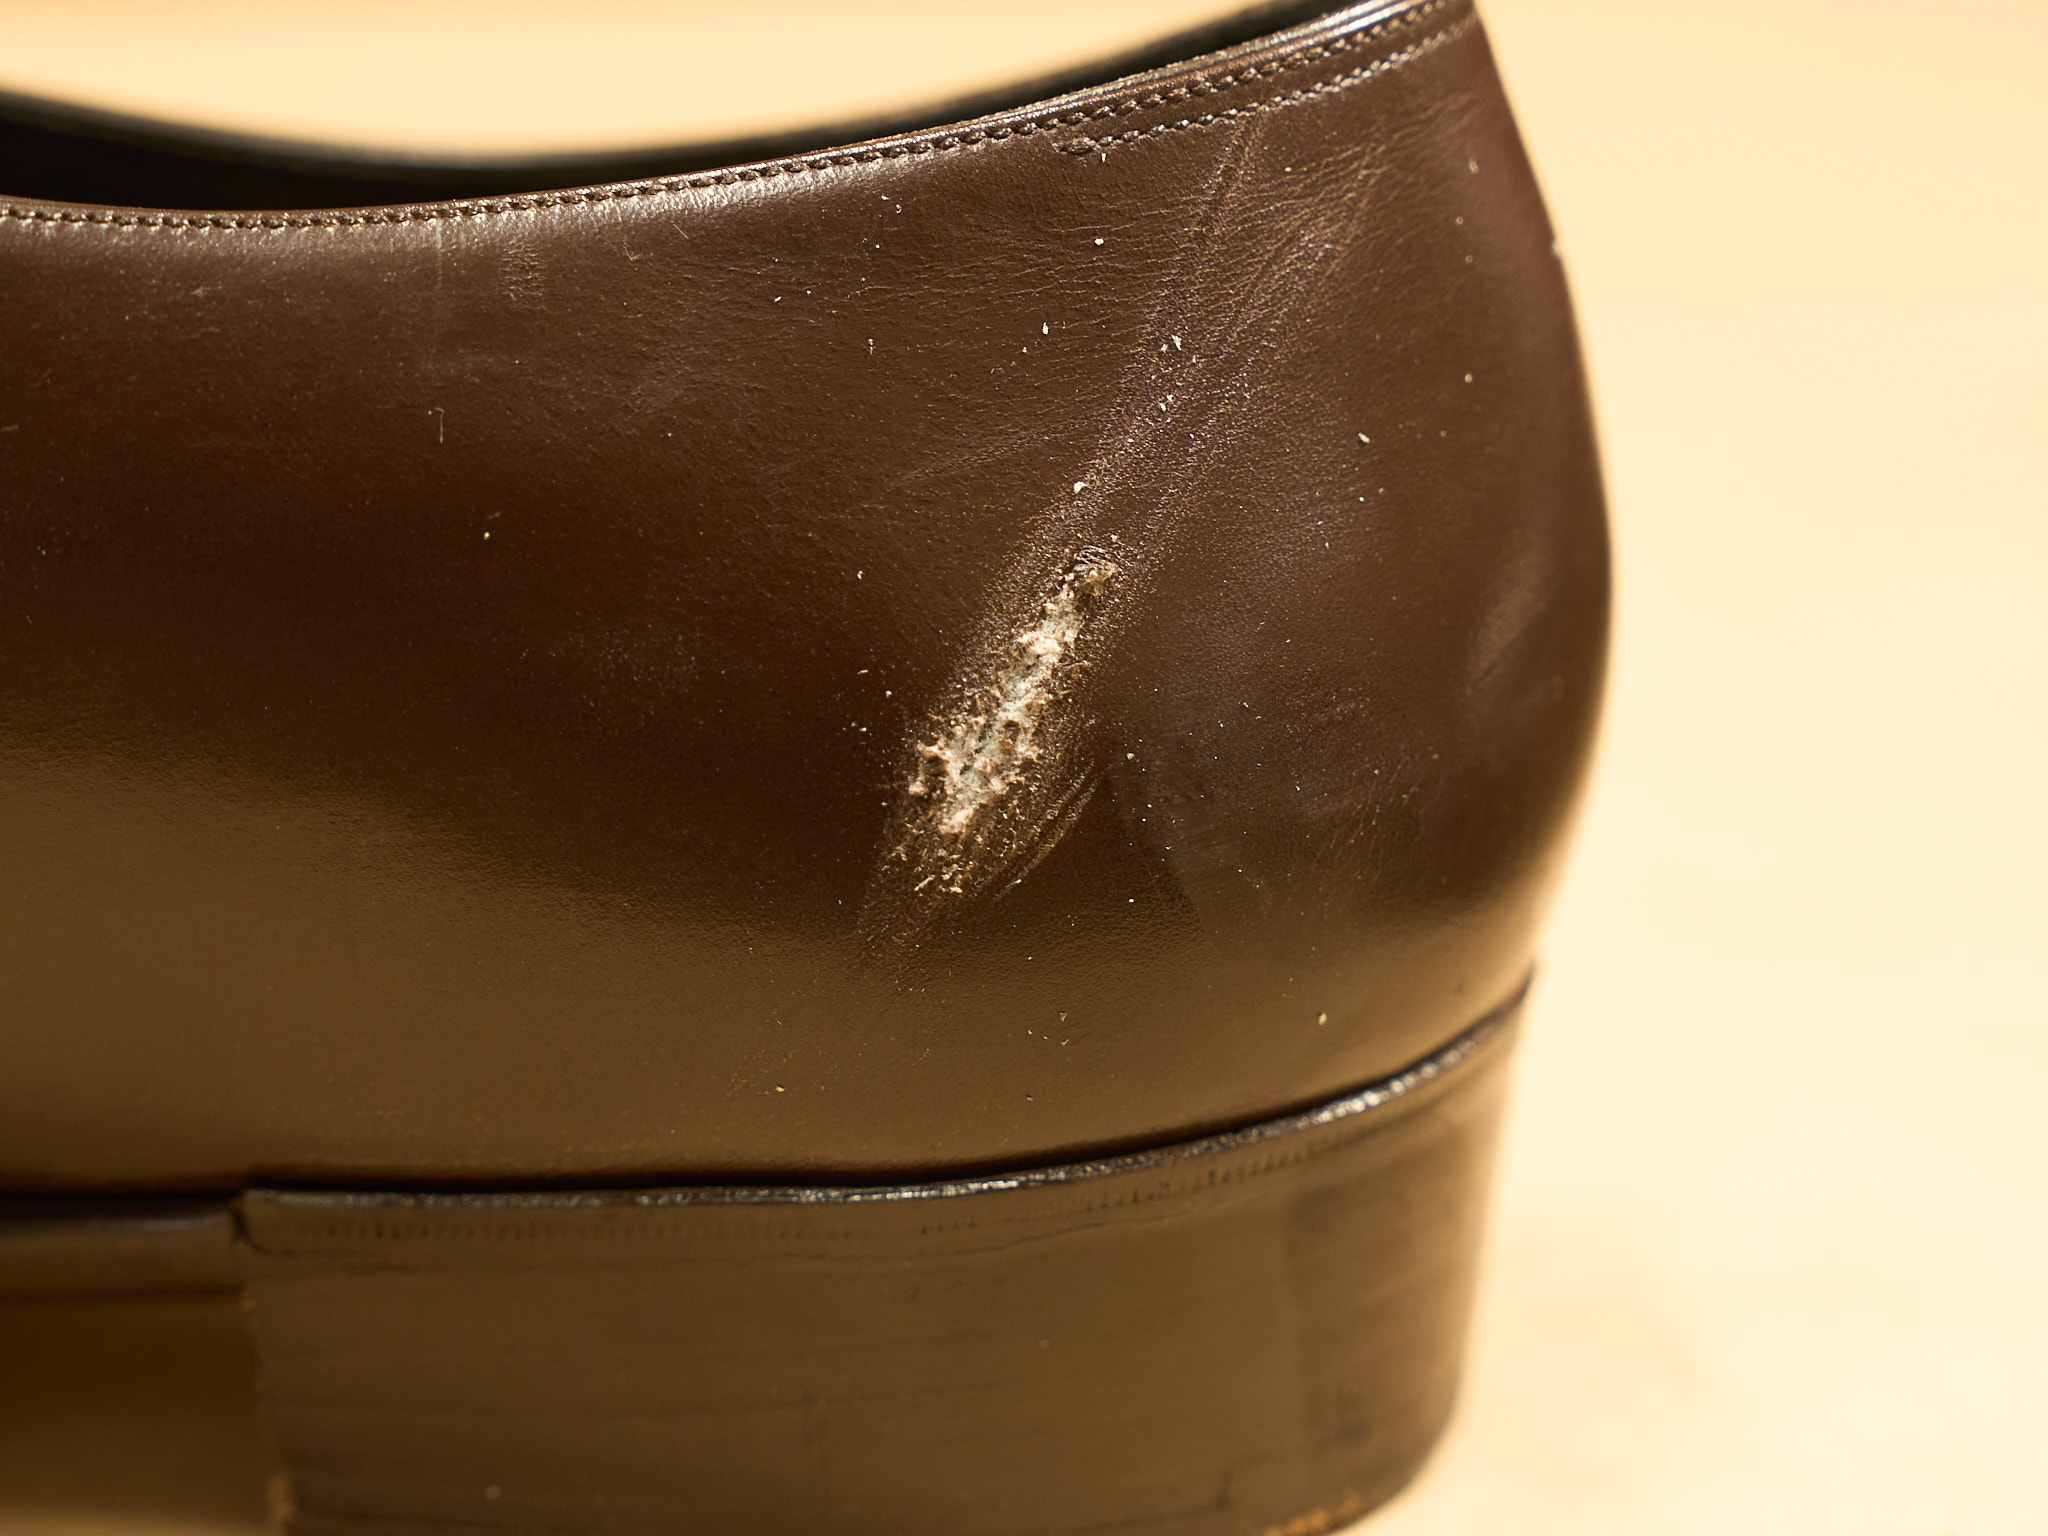
A "deep scratch" is when the fibers in the damaged area are lifted or gouged out.
Unlike a scratch, the surface will have three-dimensional damage. Cream and wax alone won't repair the damage.
This kind of damage is hard to repair on your own. You will need to ask a professional. I'll explain more later.
How to Fix a Scuff
A scuff returns to its original state once you even out the uneven color, then add color and shine to the surface.
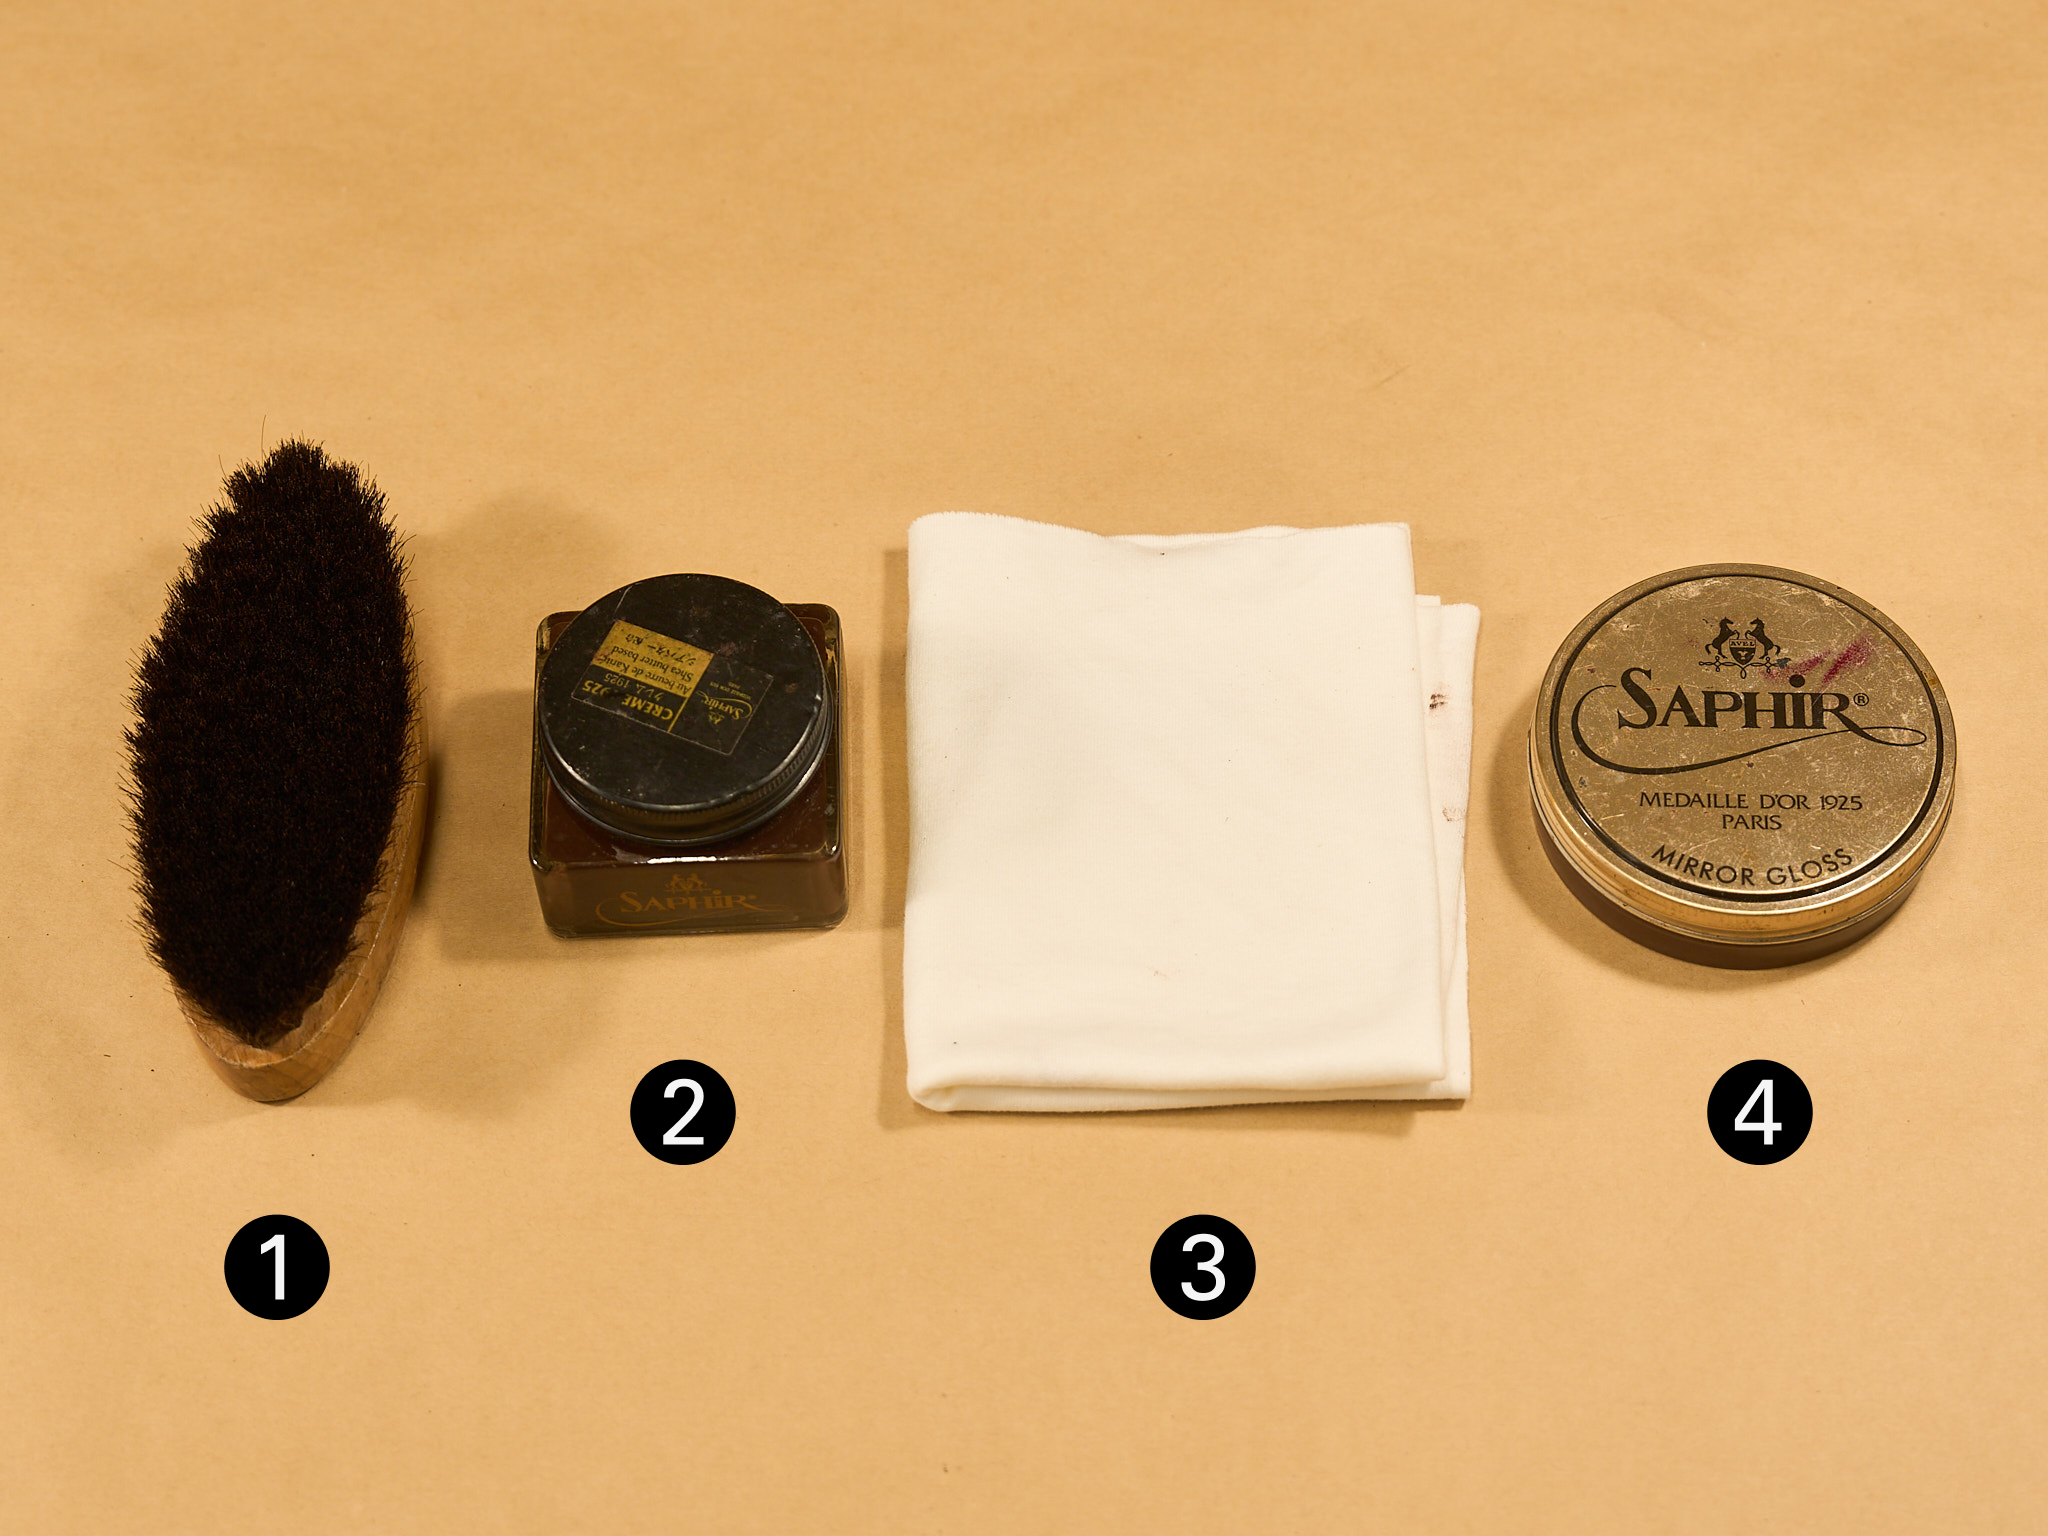
Tools You'll Need

All of these are basic shoe care items. If you don't have them yet, this is a good chance to build your own kit—you can use them for everyday care as well.
-
Horsehair brush: To sweep off dust and dirt from the surface.
-
Cream: A cream that matches the color of your shoes. If you can't decide on the shade, pick one slightly lighter than the shoe. A close match blends in well, even if it isn't the exact color.
-
Cloth: For the final polish. Soft cotton works best. An old T-shirt cut into a cloth will work as well.
Now let me walk you through the actual repair process.
Step 1: Brush off the dirt with the horsehair brush
Start with the horsehair brush. Sweep off the dust and dirt around the scuff.
Flick your wrist and brush as if you're sweeping across the shoe's surface.
Step 2: Apply the cream
Put a small amount of cream on the cloth or on your finger.
Work it into the faded area, as if you're letting the cream soak into the leather.
Then leave the shoe for one or two minutes, until the cream dries.
Step 3: Polish with the cloth
Once the cream dries, polish the area with the cloth.
Don't scrub. Wipe gently, as if you're smoothing out the surface.
The dry buff lifts off excess cream, leaving a thin, even layer behind. The color settles into place.
If it doesn't improve even after several rounds, you may actually be looking at a scratch. Try the next method.
How to Fix a Scratch
A scratch returns to a clean state when you fill the color with cream, then layer wax on top to fill the damage itself.
Tools You'll Need
You'll use the same items 1 to 3 from the scuff repair, plus one addition: wax.
- Wax: Built up in thin layers, wax slowly hides the scratch. Like cream, choose one with color.
Now let me walk you through the steps.
Step 1: Brush off the dirt with the horsehair brush
Use the horsehair brush to sweep off the dust and dirt around the scratch.
Use a flick from the wrist, brushing as if you're sweeping across the surface of the shoe.
Removing the dust and dirt will help the wax grip the leather and give a cleaner finish.
Step 2: Apply the cream
Put a small amount of cream on the cloth or on your finger, and apply it to the scratch.
Press it firmly into the roughened fiber layer. Apply the cream until you can no longer see where the color was fading.
Step 3: Polish with the cloth
Use a clean side of the cloth and polish the surface.
Don't rub too hard. Wipe gently, as if you're stroking the leather.
If the cream feels tacky and won't polish well, add one drop of water. The cloth will glide more smoothly and become easier to work with.
Step 4: Apply the wax
Put a small amount of wax on the cloth or on your fingertip, and work it into the scratch.
Repeat — add more wax, press it into the scratch — until the scratch is no longer visible.
Wax sets and bonds as it dries. After pressing the wax, leave it to dry for two to three minutes.
Step 5: Polish with the cloth
Once the wax is dry, smooth out the surface with the cloth.
As with the cream, one drop of water makes the cloth glide more easily and helps even out the wax layer.
Hard rubbing will remove the wax. The trick is to rub gently, as if you're stroking the surface.
If the scratch is still visible, repeat Steps 4 and 5 until it fades.
Why Deep Scratches Need a Professional
A deep scratch is rarely something you can fix at home.
Repairing will need many tools, and each step calls for professional judgment. Without that knowledge and experience, there is a risk of worsening the damage.
For a deep scratch, take the shoes to a professional repair workshop.
Here's why, in detail.
1. The color has to be customized to match the leather
After filling the gouged area with cream, the color needs to match the leather around it.
Ready-made repair creams do exist. But even a slight color difference will stand out — the repaired area won't blend in with the leather around it, and it will be prominent rather than fade.
In practice, the work calls for mixing several repair creams to match the leather's exact shade.
That kind of color matching is hard to do without experience.
2. The job needs many tools and a lot of time
In addition to several repair creams, you'll need to gather more tools.
You'll also need a putty-like material called leather filler to fill the gouge. That alone will take a long time.
You will need to build up thin layers of leather filler and dry each layer before applying the next. This work can take hours, sometimes days.
When you add up the cost of the tools and the time of the work, a repair workshop is a more practical choice.
3. A failed repair makes the next repair harder
If you apply leather filler the wrong way, it can crack as it dries or leave a texture that doesn't match the original leather.
Once a filler is applied, removing it completely is difficult. In some cases, the shoe may end up irreparable.
A partially repaired shoe can also be harder for a repair workshop to handle. Leave the damage as it is. Bring the shoes without doing anything.
Frequently Asked Questions
Here are common questions about repairing scuffs, scratches, and deep scratches.
Q. Can I get a scuff out just by brushing?
A. Brushing alone won't restore the color.
A scuff is a loss of color from the leather's finish layer. You will need a cream that adds color.
Brushing the shoes after applying the cream is an important step. It cannot actually repair the shoes.
Q. Can I fix the damage with things I already have at home?
A. Household tools won't repair leather shoes.
You'll see many guides that suggest household items for shoe repair. None of them actually fix the damage, and they may even make it worse.
- Petroleum jelly: Doesn't soak into the leather and adds no color. It isn't ideal for repairing scratches.
- Eraser: Lifts some surface dirt, but the heat and pressure from the friction can damage the leather's coating even further.
- Dish soap: Too strong. It strips the oils the leather needs, which can cause the leather to dry out and crack.
- White vinegar: Acidic. It can discolor or degrade the leather's surface finish.
- Melamine sponge: Abrasive. It can remove the leather's surface finish.
Don't try to use these products. Use proper tools made for the job.
The most important part of repairing leather shoes is knowing which damage you can fix yourself and which damage should be handled by a professional.
For a scuff or a scratch, the tools and steps in this article are enough to restore the leather. For a deep scratch, don't try to repair it yourself—take the shoes to a repair shop.
I hope this guide will help you keep your shoes in good condition for a long time.